How to set the default screen resolution for VNC Viewer when Raspberry Pi is not connected to a monitor

A headless setup is when your Raspberry Pi is turned on without a monitor.

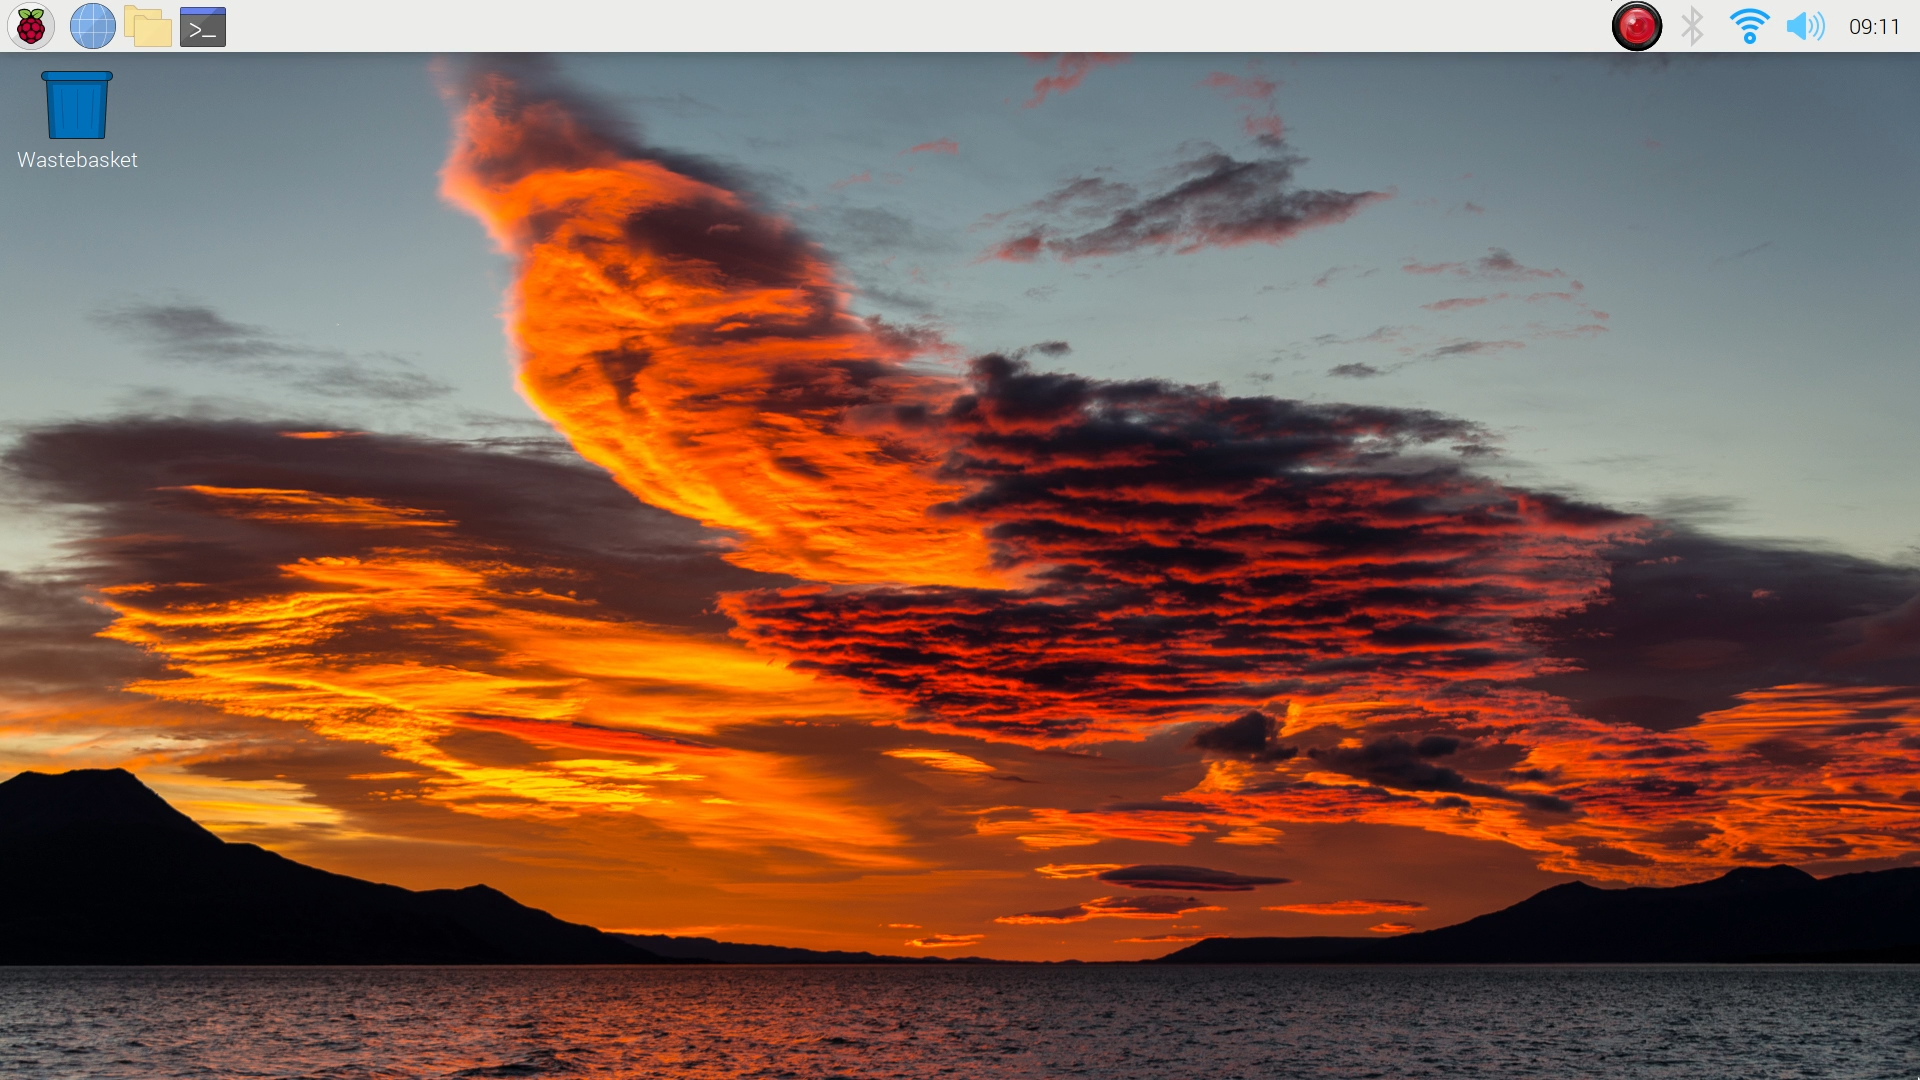
The display is not needed usually, especially if your access is only via SSH. The issue would be if you connect via VNC Viewer, the display will look like this.

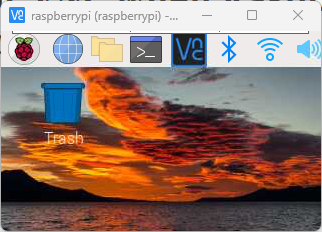
The icons are too big but the screen is too small.

What’s happening here is that Raspberry Pi will use a very small screen resolution when it is not connected to a monitor. So when you connect via VNC Viewer, VNC will get the same small screen resolution.

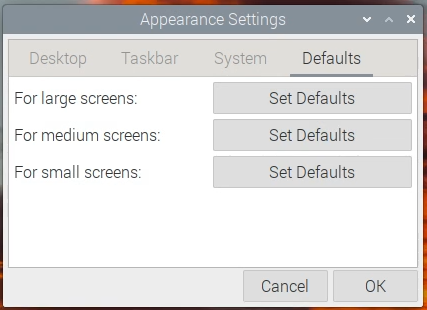
To solve this, we need to change the default headless screen resolution of the Raspberry Pi. You can follow the instructions below to set this.

Changing the default screen resolution of a headless Raspberry Pi

Continue reading How to set the default screen resolution for VNC Viewer when Raspberry Pi is not connected to a monitor

How to Fix Typing Wrong Keyboard Characters in Raspberry Pi

The first time I used a Raspberry Pi years ago, I got frustrated that I could not connect to the WiFi Network. So I tested on the text editor if I am typing the correct password. As it turns out, pressing the backslash (\) on the keyboard will type the hashtag symbol (#), and if I press Shift + 2 will type double-quotes (") instead of At sign (@).

The reason for the incorrect characters being typed is by default the Raspberry Pi is set to use a UK-based keyboard layout. To correct this, we need to reconfigure the keyboard layout to the ones we are using.

In my case, I am using a US-based keyboard layout. In the tutorial below that is what I am going to use. You can select the keyboard layout that you are using.

There are several ways to update the Keyboard Layout in a Raspberry Pi, you may choose which one you prefer on the list below.

Continue reading How to Fix Typing Wrong Keyboard Characters in Raspberry Pi

How to change the System Font and Icon Size of Raspberry Pi Desktop

Depending on the screen size or the usage of the Raspberry Pi, I usually tweak the font size and icon size.

If I am teaching or recording videos, I want the icon and font size to be large. If I am blogging, then I want them to be medium size. If I am using a small resolution screen then I want to change the icon and font size to a smaller proportion.

Appearance Settings

Luckily, Raspberry Pi has a Set Defaults icon for different screen sizes which makes it quick for me to change the sizes.

To change the system icon and font size of the Raspberry Pi head over to Appearance Settings and tweak the configuration there.

If you need guidance or instructions on how to navigate the settings then follow the tutorial below.

Continue reading How to change the System Font and Icon Size of Raspberry Pi Desktop

How to change the Desktop Background of Raspberry Pi

When running Raspberry Pi on a fresh install it has a default background of a photo. I’m not really a fan of the default photo so I often change this to a lighter wallpaper or a solid dark background.

Default Wallpaper of Raspberry Pi OS release date April 4, 2022

Below are the steps to change the Desktop Background.

Continue reading How to change the Desktop Background of Raspberry Pi

How to Disable Screen Sleep in Raspberry Pi

If you have been using a Raspberry Pi, you might have encountered that the screen sleeps or turns off after some time when you do not use the mouse or keyboard.

The turning off of the display when there is no activity in Raspberry Pi is called Screen Blanking. By default this is enabled.

Screen Blanking or sleeping is good if you want to save power, but distracting (sometimes annoying) if you are doing something in the Raspberry Pi.

To turn this feature off you do not have to install xscreensaver, you only need to disable it in the Raspberry Pi Configuration.

Follow the steps below to disable screen sleeping of your Raspberry Pi.


Steps to disable Screen Blanking or Sleeping with the Raspberry Pi

Click on the Menu button on the upper right (Raspberry Pi Icon) >> Preferences >> Raspberry Pi Configuration.

Continue reading How to Disable Screen Sleep in Raspberry Pi

How to connect Raspberry Pi to Bluetooth Keyboard

Follow the steps below to connect your Bluetooth Keyboard or Mouse to your Raspberry Pi.

I’m using a Logitech K380 on the examples below since that is my Bluetooth keyboard. But you can follow the same steps if you are using a different Bluetooth keyboard or device, such as a Bluetooth mouse.

Continue reading How to connect Raspberry Pi to Bluetooth Keyboard

How to connect Logitech M350 Pebble mouse to Windows 11

The Logitech M350 Pebble is so far the best mouse that I have used, and I have used a lot of mouse in my 30 years of existence.

I like it because it is wireless, lightweight, quiet, responds well and does not have ribs in the scroll bar. I can use the mouse the whole day without my hands or fingers getting numb.

Also, it has been a year since I bought the mouse and I have not even changed the battery yet.

When I first bought the Logitech M350 Pebble I got confused because it says that it has Bluetooth connection. But when I saw the wireless USB dongle, I thought I got tricked. As it turns out this mouse has both – a (1) wireless USB dongle mode and a (2) Bluetooth mode.

Continue reading How to connect Logitech M350 Pebble mouse to Windows 11

How to connect Logitech K380 to Mac (with Screenshots)

The Logitech K380 Bluetooth Keyboard is so far my most used keyboard. I like how I can switch connection to 3 different computers with a press of the button.

I have connected my Logitech K380 to my Windows laptop and also to a Raspberry Pi.

In this tutorial, I connected the K380 keyboard to a Mac computer. What I used is a Macbook Air, but the tutorial should be the same even if you are using a Macbook Pro or an iMac with an M1 or Intel processor.

Logtech K380 Keyboard

Step-by-Step Instructions on how to connect Logitech K380 Bluetooth Keyboard to Mac

#1

Click on the Apple Menu and select System Preferences…

Continue reading How to connect Logitech K380 to Mac (with Screenshots)

How to connect Logitech K380 Keyboard to Windows 11

The Logitech K380 Keyboard is one of my favorite devices. It gives me fewer wires to worry about by connecting wirelessly via Bluetooth. It can also easily switch between 3 devices by pressing the F1, F2, or F3 keys.

In this article, we will do a step-by-step guide on how to connect your Logitech K380 to Windows 11.


Instruction to Connect Logitech K380 Keyboard to Windows 11

#1

Open Windows Settings by clicking the Start Menu, and searching for ‘settings’. Then click on Settings.


#2

On the left sidebar of the Settings window, click on Bluetooth & devices.

Continue reading How to connect Logitech K380 Keyboard to Windows 11

How to reverse the F-Keys of Logitech K380 Keyboard

I have been using my Logitech K380 Keyboard for about a week now and I’m very happy with it.

I like it because it is quiet, has some weight, and can connect and switch to 3 devices with a press of the button.

When I received it when I press the F-keys, its default behavior is to use alternate functions like control the volume and media.

If I wanted to use F1 or F2 I have to click on the fn key then press the F-key. As someone who uses a lot of the F-keys due to my work, this is annoying.

Luckily, I was able to solve this issue by reversing the behavior of the F-keys. Now when I press the F11 to full screen my chrome browser it will work without pressing the fn key.

I think some people call this process Fn Lock

Follow the instructions below to reverse the behavior of the F-keys.

Continue reading How to reverse the F-Keys of Logitech K380 Keyboard