How to Format an SD Card after using it on a Raspberry Pi (Windows Disk Management)

Whenever you install a Raspberry Pi Operating System (Raspbian, Ubuntu Mint, etc.) on an SD Card you will get two drives. One is formatted in FAT32 and the other in Linux Filesystem Format.

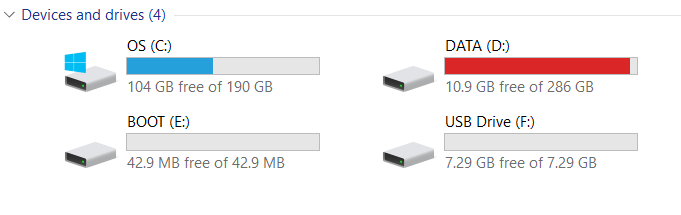
On the photo above here the SD card has 2 drives. E: and F:.

E: FAT32 42.4 MB Max Size
F: Linux File System ????

Note: There is actually a way to know what specific file system and how big it is for the Drive F:. I am avoiding it on this post as it would complicate matters.

Note: You may get a different drive for your SD Cards with Raspberry Pi OS when you insert them on Windows.

You can read more about SD Card Disk Partitions when using it for a Rasberry Pi here.

Now when you want to use an SD Card back to like using it on your Android Phone or camera, you just cannot use it by simply inserting it on the SD Card slot and turning on your gadget. You have to properly format the SD Card.

Note: If this method does not work for you, I will be writing another method for Windows, Mac and Linux systems in the future.


Problem

If you format separately the two drives (E: and F:), you will end up with two drives instead of one that has the full capacity of the SD Card.

Continue reading How to Format an SD Card after using it on a Raspberry Pi (Windows Disk Management)

SD Card Partitions when installing Raspbian for Raspberry Pi

From the very start that I used a Raspberry Pi I have always been curious about how it partitions the microSD Card every step of the Raspbian installation to running the Raspberry Pi.

You will see below on what happens to your SD Card Paritions every step of the installation to running the Raspbian on your Raspberry Pi.


Testing Parameters

SD Card Sizes

I shall be using 2 SD Card memory sizes, 8GB and 16GB. The reason for me using these memory sizes is for us to see if there are any differences on the SD Card Partitions depending on the SD Card size.

Checking of the SD Card Partitions

I shall use Partition Wizard on Windows 10 to check the SD Card partitions as it has a graphical representation of the different partitions and it can detect Linux and Mac file systems. Continue reading SD Card Partitions when installing Raspbian for Raspberry Pi

Making an SD Card as Permanent Storage in Windows 10

I am using a laptop which only has 32GB for its main storage. Unfortunately, this becomes full quickly if I will be installing a lot of programs and add some cloud storage to it.

Fortunately, the computer has a microSD Card slot which I can use to expand my storage, but I could not install programs or put my cloud storage directory to it since it is not recognized as a Permanent Storage by Windows.

The microSD Card slot on my laptop

Do not worry, though, there is actually a way to make the Windows see your SD Card as a Permanent Storage. Below are the steps that you need to do.

Note: This tutorial would also work on Windows Tablet who also has the same problems as I have.

1. Make sure that your SD Card is formatted to NTFS

To be able to mount the SD Card as a Permanent Storage it must be formatted to the same file system as your computer’s main storage file system. For Windows 10 case the main file system is NTFS.

Usually SD Cards are formatted in FAT32 but let us check first. Continue reading Making an SD Card as Permanent Storage in Windows 10

In Photos: Adafruit microSD Card Breakout Board+

I recently bought an Adafruit microSD Card Breakout Board+ since I wanted to try logging projects.

I had a hard time imagining how the microSD Card Breakout Board would fit physically into my project so I decided to create this post just in case you want to see close up photos of the breakout board.

Packaging

Continue reading In Photos: Adafruit microSD Card Breakout Board+