ESP8266 WebServer WiFi Access – Quick Setup

We will setup the ESP8266 to connect to your WiFi Network and then communicate with your computer over WiFi.

The goal is to setup the ESP8266 as a Web Server and for it to generate a random number that it will send via WiFi to a web browser.

Hardware

You will only need the following for this tutorial.

  • Adafruit Feather Huzzah with ESP8266
  • microUSB cable

You do not need to solder the pins of the Adafruit Feather HUZZAH ESP8266 since we will not wire anything to it.

Continue reading ESP8266 WebServer WiFi Access – Quick Setup

Arduino Uno Schmitt Trigger Voltage Logic Levels

I wanted to know the Schmitt Trigger Voltage Logic Levels for the Arduino Uno since I want to know on what voltage would the digital input pin detect a logic high or a logic low.

I know that the Arduino Uno uses the ATmega328 with a 5V as its voltage supply. I checked the ATmega328 specification sheet and since it was too long to read (TL;DR), I would rather check using a Signal Generator and an Oscilloscope.


The Setup

Here is the list of equipment that I used for doing this experiment

  • Arduino Uno powered via USB port
  • Laptop (Windows)
  • 2-Channel Oscilloscope (PicoScope)
  • Signal Generator

Continue reading Arduino Uno Schmitt Trigger Voltage Logic Levels

How to use C++ Classes in Arduino IDE without creating a Library

If you looked inside an Arduino Library you would see filename extensions such as .h and .cpp, which makes us conclude that the Arduino IDE uses C++ for its codes. If you look inside those files most of the Arduino Libraries have C++ classes inside of them. The question now is: Can you use C++ Classes in Arduino IDE without Creating a Library?

The answer to that is YES!

It is a bit tricky as there are rules you need to follow. I shall dive into that later.

Sample Code

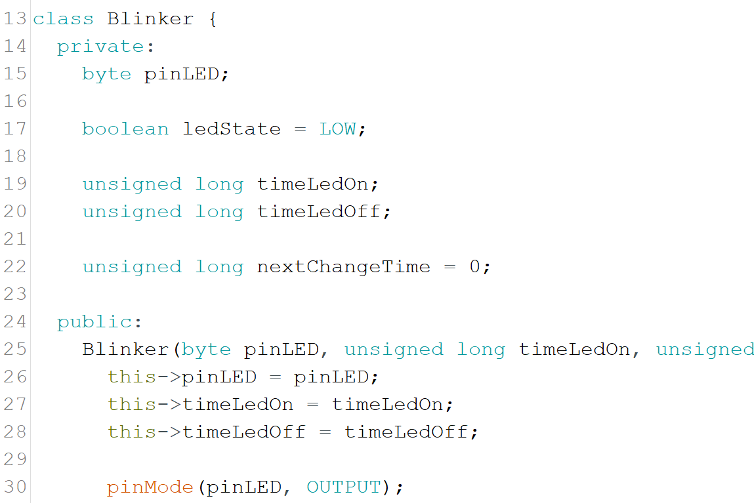
Below is a short Arduino Code with a C++ Class without using a Library.

#define PIN_LED1 3
#define PIN_LED2 4
#define PIN_LED3 5
#define PIN_LED4 6

/*
 * BLINKER CLASS DEFINITION
 */
class Blinker {
  private:
    byte pinLED;

    boolean ledState = LOW;

    unsigned long timeLedOn;
    unsigned long timeLedOff;

    unsigned long nextChangeTime = 0;

  public:
    Blinker(byte pinLED, unsigned long timeLedOn, unsigned long timeLedOff) {
      this->pinLED = pinLED;
      this->timeLedOn = timeLedOn;
      this->timeLedOff = timeLedOff;

      pinMode(pinLED, OUTPUT);
    }

    // Checks whether it is time to turn on or off the LED.
    void check() {
      unsigned long currentTime = millis();

      if(currentTime >= nextChangeTime) {

        if(ledState) {
          // LED is currently turned On. Turn Off LED.
          ledState = LOW;
          nextChangeTime = currentTime + timeLedOff;
        }
        else{
          // LED is currently turned Off. Turn On LED.
          ledState = HIGH;
          nextChangeTime = currentTime + timeLedOn;
        }

        digitalWrite(pinLED, ledState);
      }
    }
};

/*
 *  BLINKER CLASS VARIABLES DECLARATION
 */
Blinker blink1 = Blinker(PIN_LED1, 500, 500);
Blinker blink2 = Blinker(PIN_LED2, 1000, 1000);
Blinker blink3 = Blinker(PIN_LED3, 2000, 2000);
Blinker blink4 = Blinker(PIN_LED4, 1000, 2000);

void setup() {

}

void loop() {
  blink1.check();
  blink2.check();
  blink3.check();
  blink4.check();
}

Okay, I admit that was not very short. At least you can see that I have used a C++ Class without creating a library. You can compile it in your Arduino IDE if you still do not believe me. You can see the Circuit Diagram somewhere below, there is also a Fritzing Diagram if you want to seriously test it.

You can check the code in my Github here.

Continue reading How to use C++ Classes in Arduino IDE without creating a Library

Project Diary: Self Balancing Robot

I have always wanted to make a self-balancing robot. This post will be a diary on my journey to making one.

I’ll be updating this post as I go along this journey complete with details of the success and frustrations, pictures and expenses.


December 5, 2017 (Tuesday)

Ordered and paid for LSM9DS1 Breakout board from Circuit-Help. This one has an Accelerometer, Gyroscope and Magnetometer in a single board which would really be helpful for this project.
https://www.circuit-help.com.ph/product/adafruit-9-dof-accelmaggyrotemp-breakout-board-lsm9ds1/

After much research I saw a LSM9DS0 Breakout board in Lazada, much more expensive (₱ 1,446/pc) but has a higher accuracy than the LSM9DS1. Since I already bought the LSM9DS1 Breakout Board I just have to live with my decision.

Expenses for the day

Adafruit 9-DOF Accel/Mag/Gyro+Temp Breakout Board – LSM9DS1 ₱ 905
Shipping (via LBC Express) ₱ 160
TOTAL ₱ 1,065

Total Expense so far: ₱ 1,065


December 6, 2017 (Wednesday)

Circuit-help messaged me that they have already shipped the product. Hopefully, tomorrow it will arrive. Continue reading Project Diary: Self Balancing Robot

Arduino MapFloat Library Documentation

I have always used the Arduino IDE map function but have not been able to use it for float values. With these I have made the MapFloat Library so that I could extend the map function to floating point numbers.

A very useful feature when I want to have decimal places on my map function.


Introduction

A library that contains the mapFloat function which re-maps a floating point number from one range to another. The mapFloat function is inside the MapFloat library.

This library is based on the Arduino Map Function.

Here is a link to the reference of Arduino Map Function.
https://www.arduino.cc/reference/en/language/functions/math/map/

Installing the MapFloat Library

Download the MapFloat Library from RadishLogic’s Github repository.
https://github.com/radishlogic/MapFloat

Clone or Download >> Download ZIP. This will download the file MapFloat-master.zip.

Unzip the MapFloat-master folder inside the zip file and paste it on the library folder where your Arduino IDE is installed. Continue reading Arduino MapFloat Library Documentation

Using an External Text Editor in Arduino IDE

Whenever I program an Arduino based project I would always use Sublime Text as my editor then compile and upload using the Arduino IDE. I prefer using Sublime Text as my Arduino Sketch editor as it gives more flexibility on color highlighting.

This post is a tutorial on how to use Sublime Text as an External Editor. It also answers the why, advantages and disadvantages of using External Editor.

In case you prefer to use Atom Text Editor  or Visual Studio Code than Sublime Text then you may still do so by opening your code on Atom Text Editor.

(Left) Sublime Text; (Right) Arduino IDE
Both editors are showing the same stripped down version of the Blink code.


Continue reading Using an External Text Editor in Arduino IDE

Setting Arduino .ino files to open as C++ files in Sublime Text

I have always preferred developing in Sublime Text especially for Arduino Projects since the syntax highlighting is better than doing it in Arduino IDE. Unfortunately, it is annoying to keep opening .ino files on Sublime Text then set the syntax highlighting to C++ (.cpp) on each file.

Luckily, there is a way to do this automatically so that whenever I open a .ino file it will always open with a C++ syntax highlighting in Sublime Text. Below are the steps on how I did it.

Modified version of the Blink code in Arduino IDE

Note: My Sublime Text is configured to use the Color Scheme named Sixteen.


1. Open a .ino file in Sublime Text

In my case I created an Arduino Sketch, saved it then opened it in Sublime Text.  Continue reading Setting Arduino .ino files to open as C++ files in Sublime Text

Gizduino Patch Installation in Windows 10

There are two ways to install Gizduino in the Arduino IDE. One I have already written here, and the next method is written on this post. Personally, this is my favorite method of installing Gizduino as it shows a better description in selecting the Gizduino Boards in the Boards Menu.

Note: The steps below can also be used for Windows 7 and Windows 8.

If you are wondering how to install Gizduino in Windows then just follow the steps below.

1. Install the latest version of the PL2303 Prolific Driver for Windows

http://www.prolific.com.tw/US/ShowProduct.aspx?p_id=225&pcid=41

2. Download and Install the latest Arduino IDE release

Link to the Arduino Software: https://www.arduino.cc/en/Main/Software

Arduino IDE Windows Installer

Author’s Notes:

As of writing the latest Arduino IDE is 1.8.5. I prefer to download the non-install version (160 MB download). Just unzip on your preferred location on your drive, run the arduino.exe and wait for the Arduino IDE to initialize.

When unzipped it occupied around 399 MB of space in your drive. Then you can delete the zip file once unzipping was finished. Continue reading Gizduino Patch Installation in Windows 10

Gizduino Installation in Windows 10

I have my own Arduino Uno but most of the time I use a Gizduino since this is cheaper and easier to source here in the Philippines.

  • Arduino Uno (1,299 Pesos)
  • Gizduino+ mini with ATmega328 (735 Pesos)

If you are looking for a Gizduino you may purchase them in the e-Gizmo website (https://www.e-gizmo.net/)

To use the Gizduino, you will need to install the Arduino IDE to your Operating System and install the Gizduino Boards. Below are the steps for Gizduino Installation.

Author’s Note: The installation method below also works for Windows 7 and Windows 8.

1. Install the latest version of the PL2303 Prolific Driver for Windows

http://www.prolific.com.tw/US/ShowProduct.aspx?p_id=225&pcid=41

2. Download and Install the latest Arduino IDE release

Link to the Arduino Software: https://www.arduino.cc/en/Main/Software

Author’s Notes:

As of writing the latest Arduino IDE is 1.8.5. I prefer to download the non-install version (160 MB download). Just unzip on your preferred location on your drive, run the arduino.exe and wait for the Arduino IDE to initialize.

When unzipped it occupied around 399 MB of space in your drive. Then you can delete the zip file once unzipping was finished. Continue reading Gizduino Installation in Windows 10

In Photos: Adafruit Circuit Playground Classic

We have recently purchased an Adafruit Circuit Playground. I was really excited to finally able to hold it as it is a small board packing with a lot of features. Some of the features I have not used yet.

Here are the list of features of the Adafruit Circuit Playground.

  • Board Dimension: 50.6mm (2.0 inches) in diameter
  • Weight: 8.5 grams
  • ATmega32u4 Processor (3.3V, 8MHz)
  • MicroUSB for programming and debugging with Arduino IDE and power
  • USB port can act like serial port, keyboard, mouse, joystick or MIDI
  • 2 pin JST port for Power (3-6V)
  • 10 mini NeoPixels (each can display any color)
  • 1 Motion Sensor (LIS3DH triple-axis accelerometer with tap detection, free-fall detection)
  • 1 Temperature Sensor (thermistor)
  • 1 Light Sensor (phototransistor)
  • 1 Sound Sensor (MEMS microphone)
  • 1 Mini Speaker (magnetic buzzer)
  • 2 Push Buttons
  • 1 Slide Switch
  • 8 alligator-clip friendly input/output pins (pads)
  • Includes I2C, UART, and 4 pins that can do analog inputs/PWM output
  • All 8 pads can act as capacitive touch inputs
  • Green Power LED
  • Basic Blinking LED (#13)
  • Reset button

This post is about being up close and personal with the Adafruit Circuit Playground so here are the photos that you have been looking for.

If you are interested in buying the Adafruit Circuit Playground you may purchase this by buying it directly from Adafruit here.


Continue reading In Photos: Adafruit Circuit Playground Classic