To compare files in Visual Studio Code, right-click on the first file then click Select for Compare.
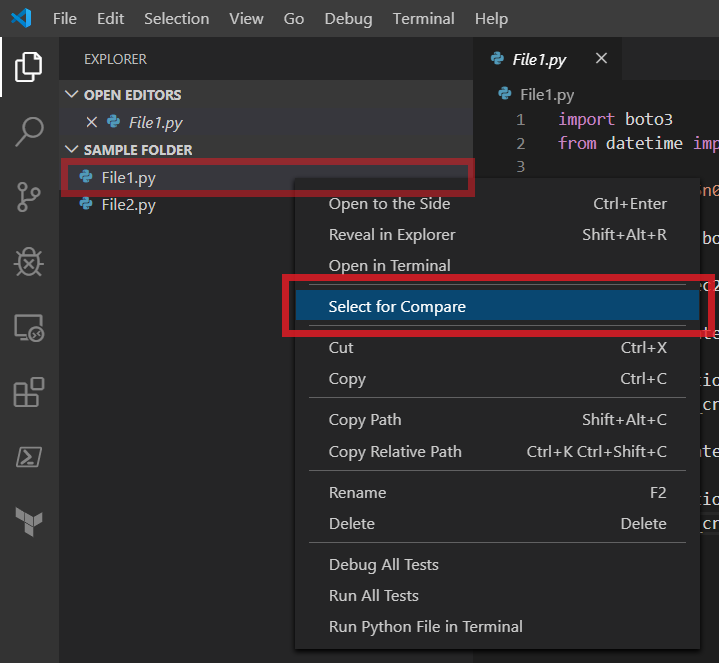
To compare files in Visual Studio Code, right-click on the first file then click Select for Compare.
It happened to me, every time I click on new post or try to Edit an existing post on my WordPress site it only shows a white blank page.
I first thought it was one of the plugins, so I disabled all of them and tried adding a new post but it still showed a blank page.
If it is not a plugin then what might it be? WordPress site is working so there is a high probability that it is not wordpress. Then the cause might probably be my Cloud Delivery Network (CDN), which is CloudFlare.
I tweaked a few settings in CloudFlare and voala, it worked! I was able to edit and create new posts again on this site.
Continue reading Fix WordPress New/Edit Post not showing with CloudFlareWhen I encountered the Network Error when developing with AWS Cognito I panicked. I was connected to the internet so why am I getting a Network Error? Even the Console output was not helpful.
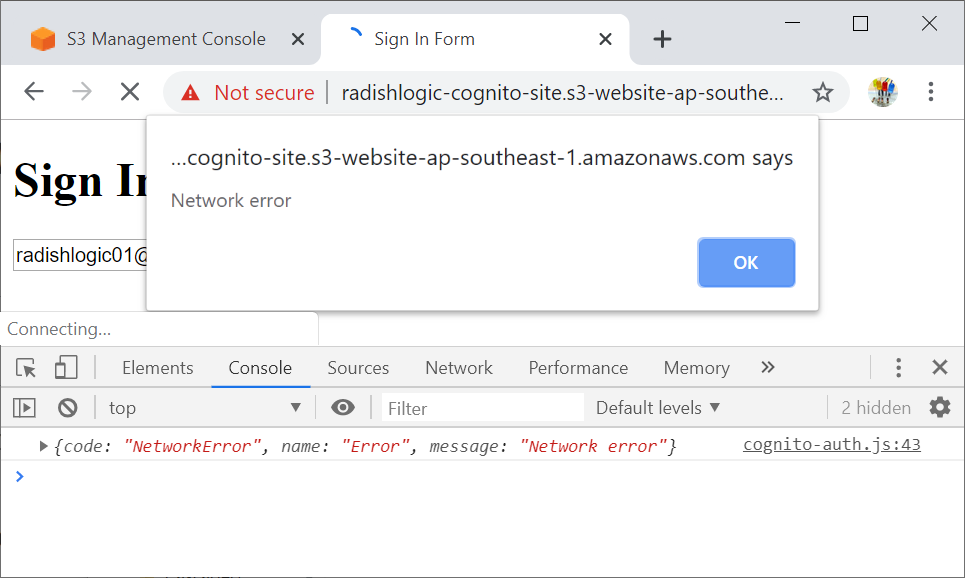
This happened to me during User Registration and Login.
Network Error happening?By default, a type=submit in a form element will automatically refresh the page when it is clicked or triggered.
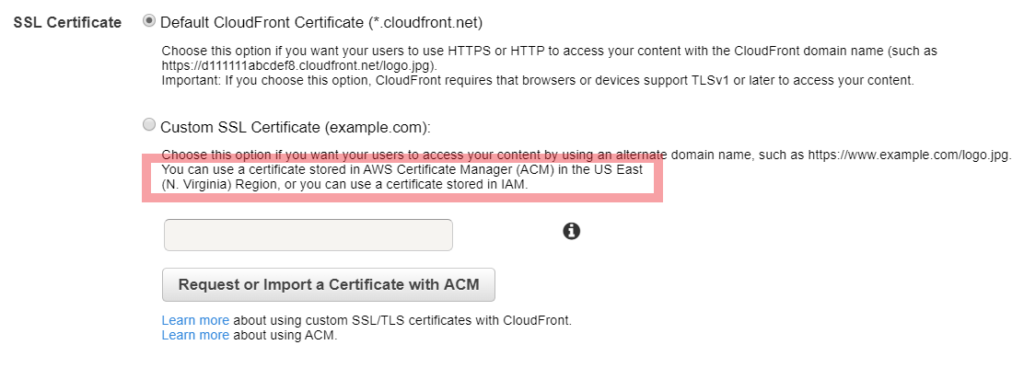
Most likely you already have an SSL Certificate in AWS Certificate Manager (ACM). Then when you go to configure it in CloudFront you cannot select the radio button that says Custom SSL Certificate (example.com) or your SSL Certificate does not show in the options.
The reason for this is that your SSL Certificate should be in the N. Virginia Region (us-east-1).
If you look closely on the words below the selection it says You can use a certificate stored in AWS Certificate Manager (ACM) in the US East (N. Virginia) Region, or you use a certificate stored in IAM.
This is also stated in the AWS CloudFront Documentation regarding the use of Alternate Domain Names and HTTPS.
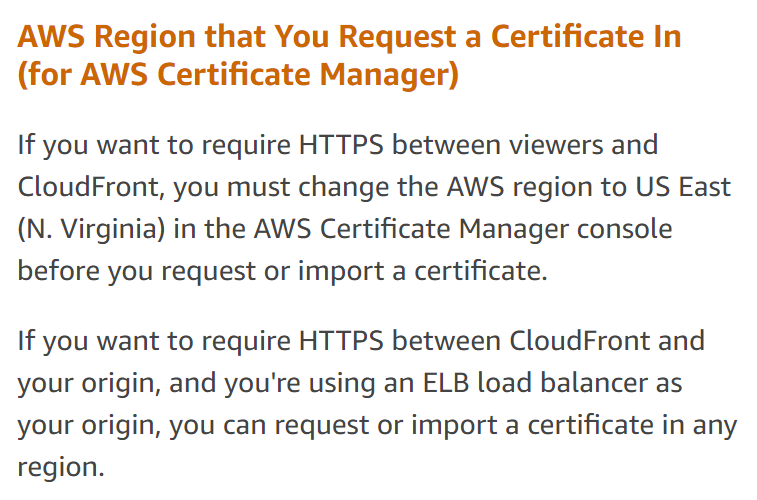
Request or upload your SSL Certificate in AWS Certificate Manager in N. Virginia Region (us-east-1) and your SSL Certificate should show on the selection.
With this you can now use HTTPS to access your services when you are working with CloudFront.
Sometimes when I create a Windows EC2 Instance from one of my custom AMIs I get an activation failed Windows Server.
Follow the instruction below to Activate your Windows Instance. (For Windows Server 2016, 2019 and later only).
Open Powershell on your Windows Server and run the command below.
C:\ProgramData\Amazon\EC2-Windows\Launch\Scripts\InitializeInstance.ps1; cscript "${env:SYSTEMROOT}\system32\slmgr.vbs" /atoThere are other ways to Activate Windows on your AWS EC2. You can check them all here.
When I create Windows Instances in AWS EC2, I usually forget to add a drive or two. With this step-by-step tutorial, I will walk you through how to create a new Volume for EC2 Instances, then make Windows use the new Volume without a reboot.
I launched a EC2 Windows 2016 Server with only 1 Block Device (/dev/sda1), which is also my Root Device.
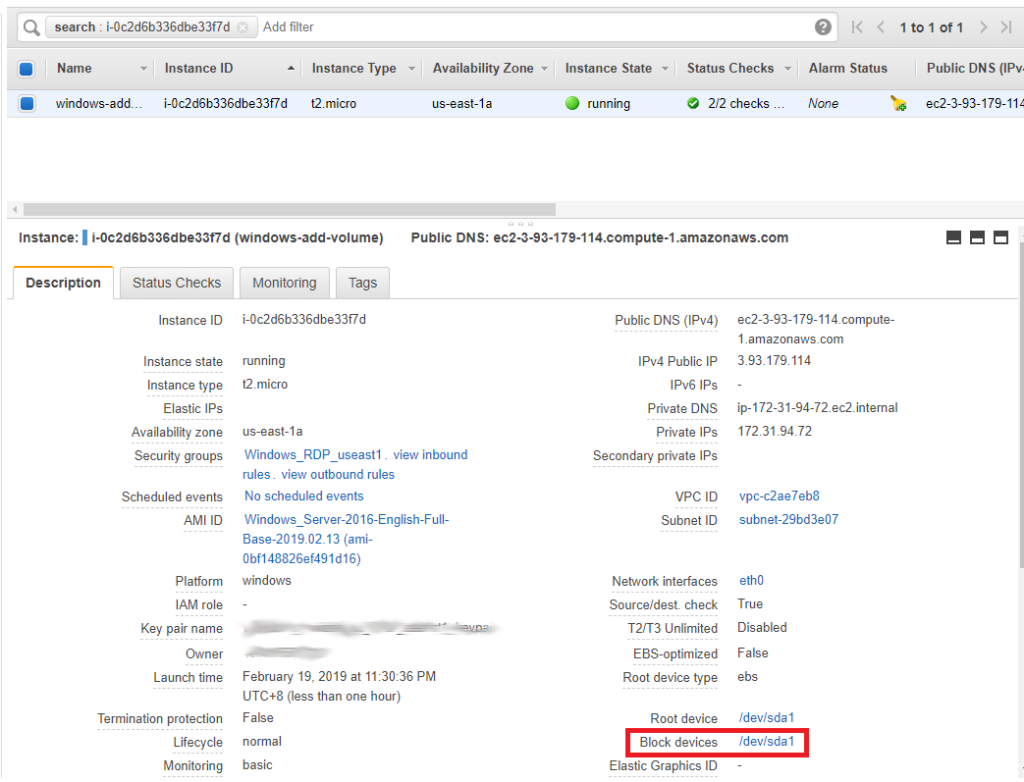
Note the Availability Zone where your instance is located, you will need this later. Mine is in us-east-1a.
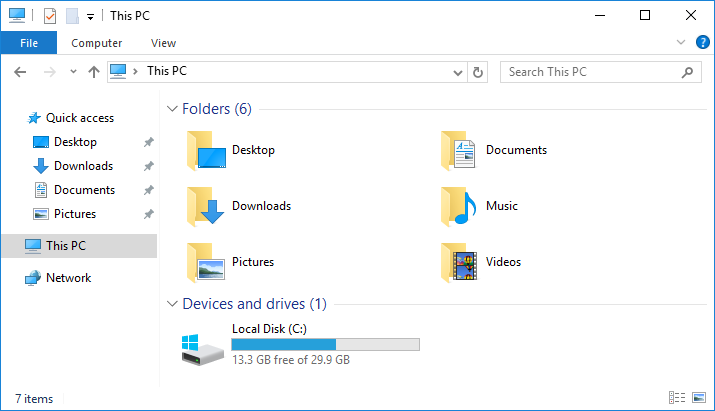
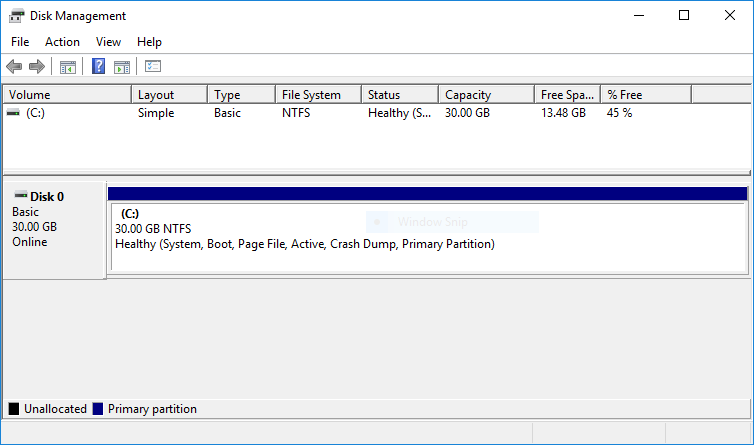
Looking inside Windows it only has 1 volume.
Now we need to attach a new Volume for our Windows Server.
Go to AWS EC2 Console, on the left sidebar click on <strong>Volumes</strong>.
We will setup the ESP8266 to connect to your WiFi Network and then communicate with your computer over WiFi.
The goal is to setup the ESP8266 as a Web Server and for it to generate a random number that it will send via WiFi to a web browser.
You will only need the following for this tutorial.
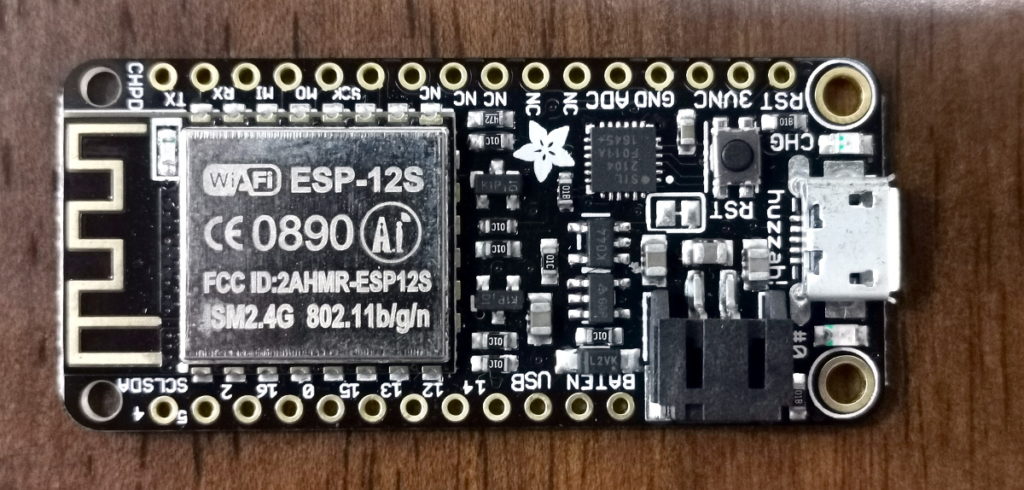
You do not need to solder the pins of the Adafruit Feather HUZZAH ESP8266 since we will not wire anything to it.
Continue reading ESP8266 WebServer WiFi Access – Quick SetupIf you plan to make the communication of your site visitors to be secure by using HTTPS then you need to use Public SSL/TLS Certificate. You can do this by requesting for a Public Certificate via AWS Certificate Manager (ACM).
Below are the advantages of using Public SSL/TLS Certificate provided by AWS Certificate Manager.
Check the step-by-step guide on how you can request a Public SSL/TLS Certificate for HTTPS access of your website/domain.
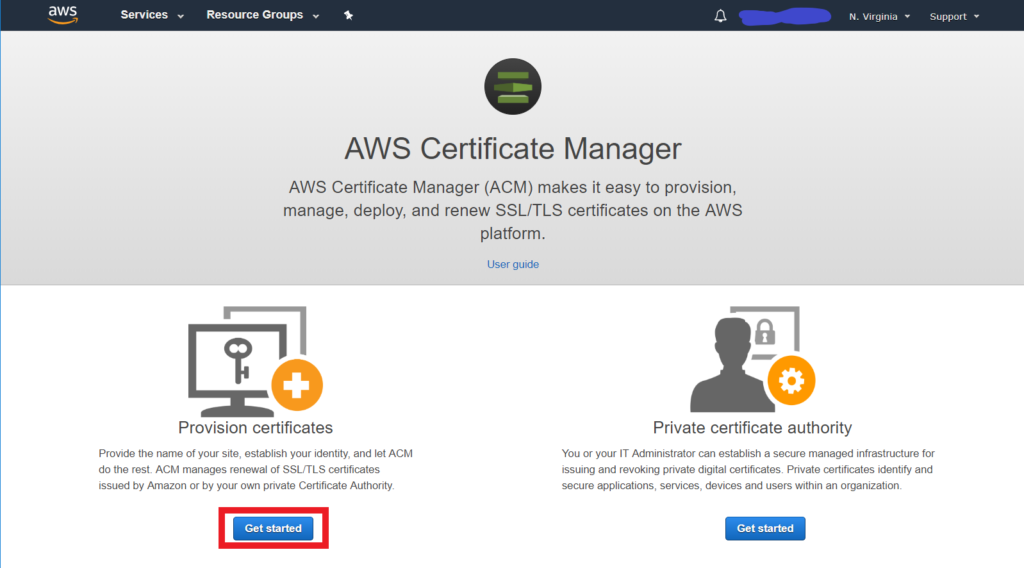
Login to AWS Console and head to AWS Certificate Manager.
Note: AWS Certificate Manager is a regional service, therefore make sure to be in the correct AWS Region. If you are new to AWS just select N. Virginia (us-east-1) as it is one of the cheapest regions.
On the AWS Certificate Manager page, click on <strong>Get started</strong>.
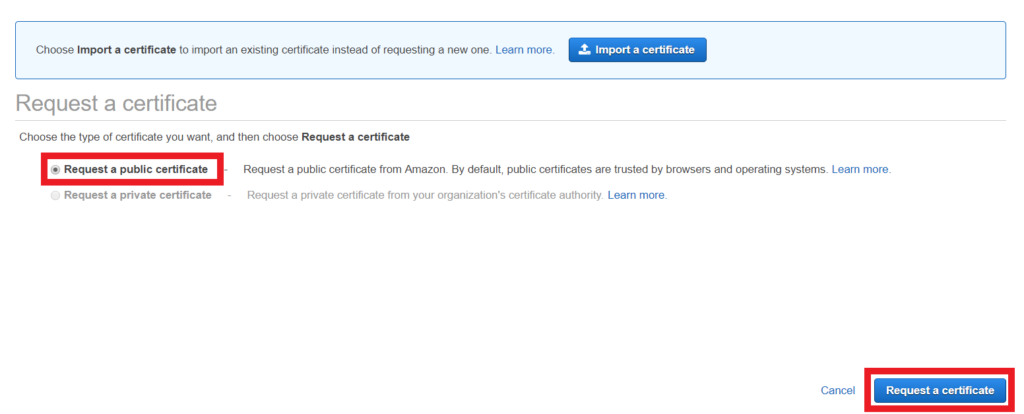
On the next screen, make sure to select the Request a public certificate, then click on Request a certificate.
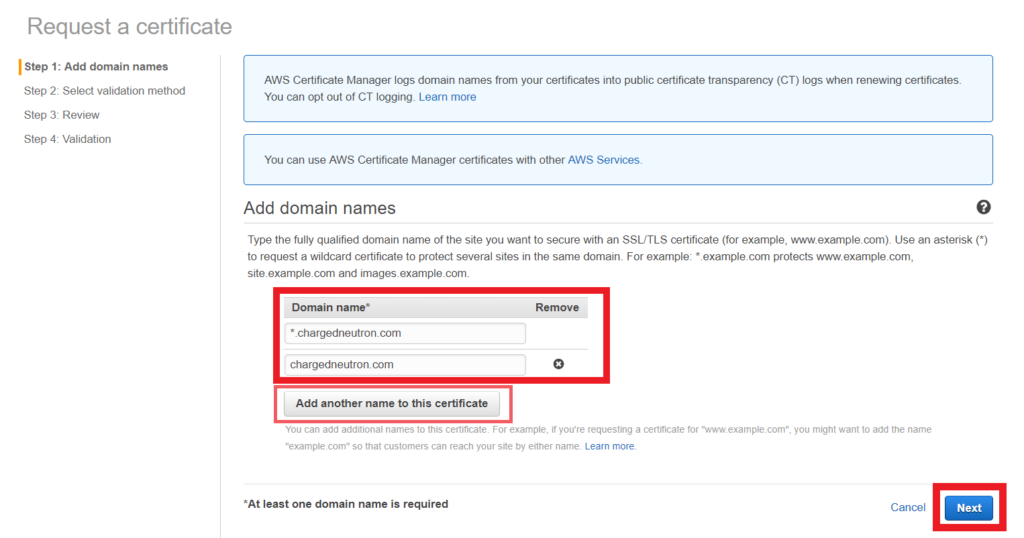
Under Add domain names. Enter the following.
| *.[Your Domain] Example: *.chargedneutron.com | The * represents a wildcard. This will allow you to use the SSL Certificate to any subdomains that you want like www.domain.com, images.domain.com, sites.domain.com, mobile.domain.com |
| [Your Domain] Example: chargedneutron.com | Apex Domain or Naked Domain Name. Your domain name without subdomains. Use this if you do not want to use www in front of your website. |
Then click on Next.
Select DNS Validation, then click on <strong>Review</strong>.
To use GoDaddy Domains with Amazon Web Services (AWS) products such as Elastic Load Balancers, CloudFront, API Gateway, etc., you will need to associate your domain with AWS Route 53 DNS.
Follow the step-by-step tutorial below on how to associate your GoDaddy Domain to Amazon Route 53.
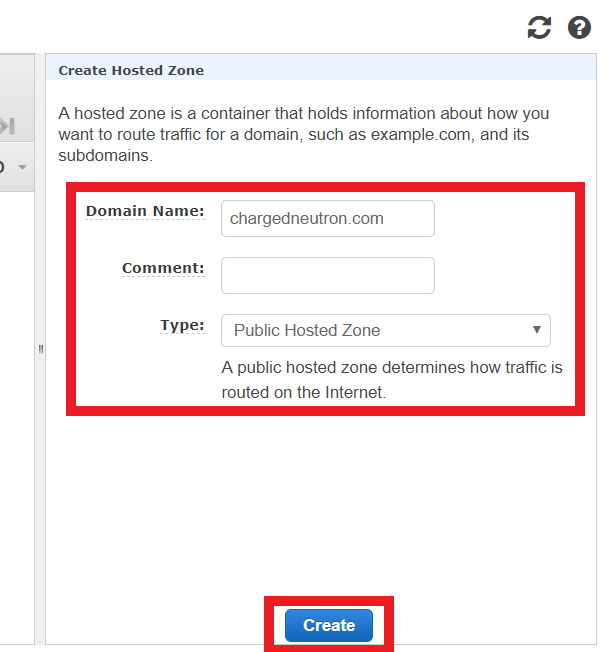
For the purpose of demonstration, I will be using my sample domain name – chargedneutron.com.
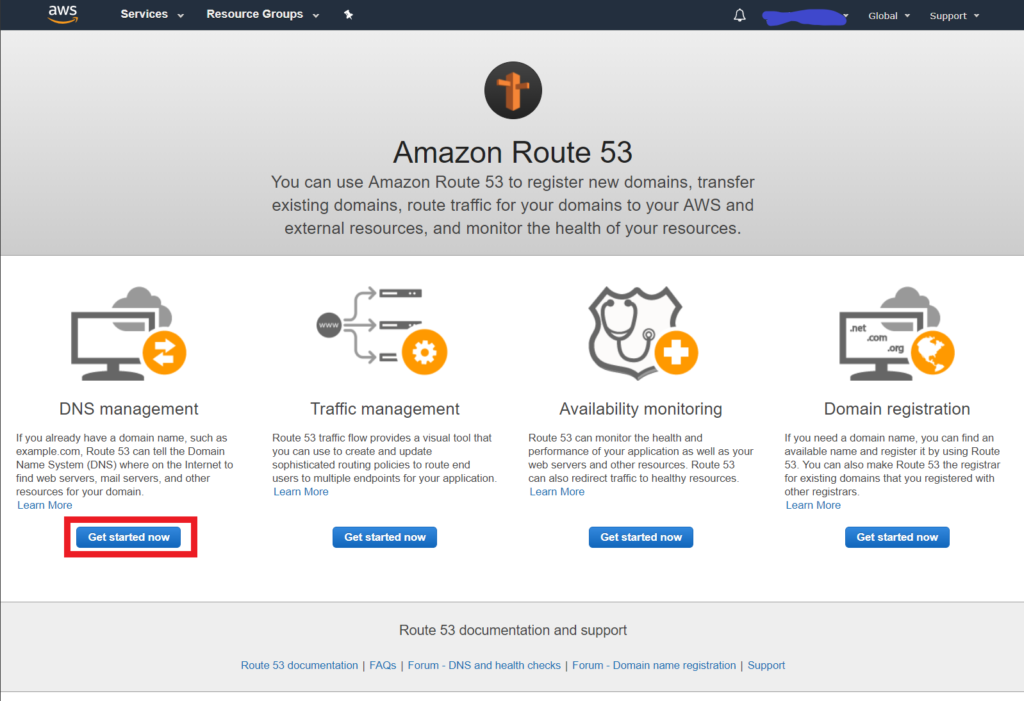
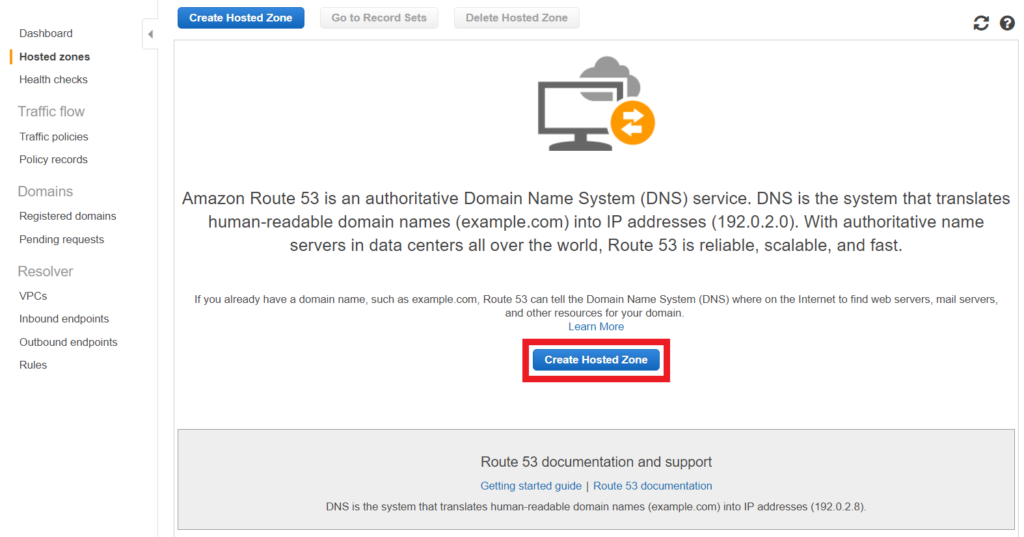
Login to AWS Console and then go to Amazon Route 53.
On the welcome screen of Route 53, click on Get started now.
Click on Create Hosted Zone.
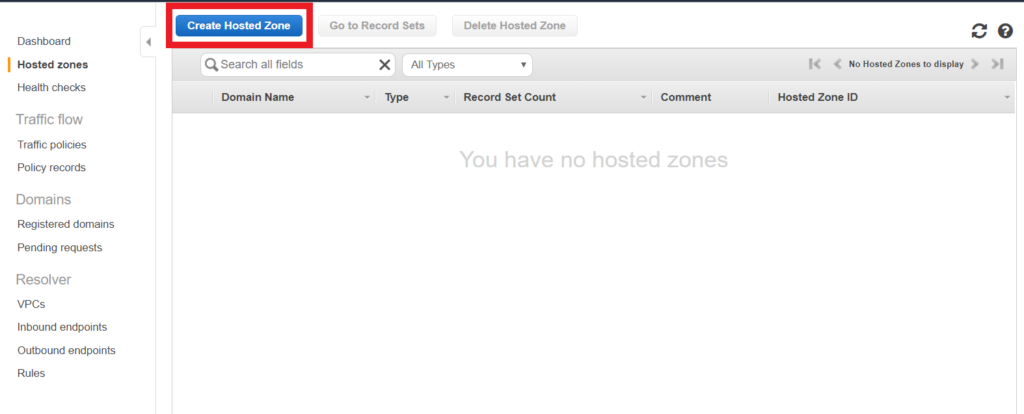
Click again on Create Hosted Zone.
A sidebar will show asking for you to input the following details about your domain.
| Domain Name: | [Name of your Domain in GoDaddy] (Required) |
| Comment: | [Put your comment here] |
| Type: | Public Hosted Zone |
Then click on Create.
You will then be redirected to the Hosted Zone Record Set page. Two entries are automatically created, NS and SOA Type.
Continue reading Using GoDaddy Domain in AWS Route 53After setting up an Active Directory (AD) on our Windows Server it is advisable to have another server to be a Secondary Active Directory Domain Controller to become the failover for Active Directory in case something happens to the first AD Server.
Below is a detailed tutorial on how to properly set up a Secondary Active Directory Domain Controller on Windows Server 2016.
Primary refers to the first Windows Server that we setup Active Directory with.
Secondary refers to the the Second Windows Server we will set Active Directory. This is what we will setup here.
Here are the major steps that we need to do
Login to your Primary Active Directory Windows Server.
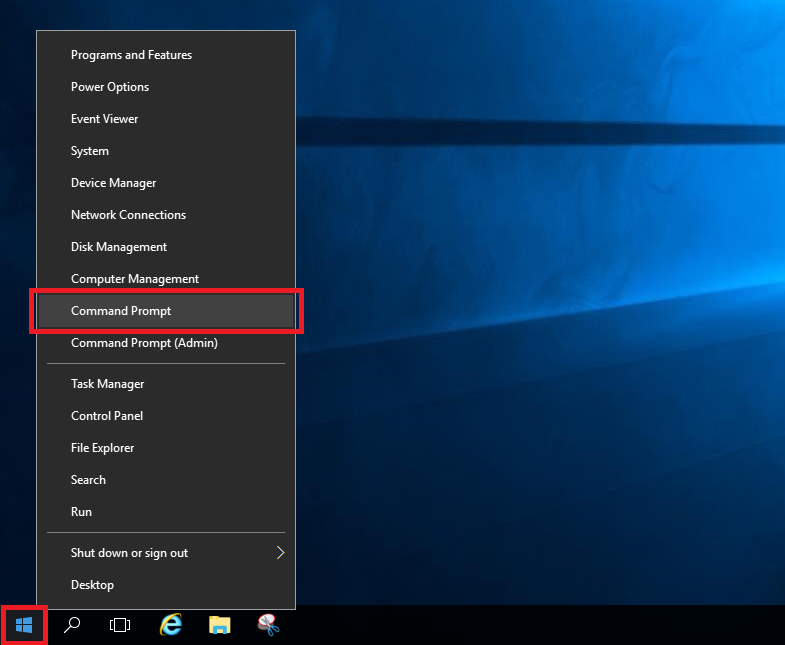
Right-click on the Window Icon on the bottom-left of the screen. Then click Command Prompt.
On the command prompt window type ipconfig then Enter.

Note the IPv4 Address. You will need this later on the Secondary Windows Server. Continue reading Adding a Secondary Active Directory Domain Controller on Windows Server 2016