How to install ChefDK in Amazon Linux 2

The ChefDK is a package that includes everything you need to start using Chef. You will need this if you want to develop using chef.

Since I always use Amazon Web Services (AWS) EC2, I tend to choose Amazon Linux 2 even for projects using Chef.

Below is a step-by-step tutorial on how to install ChefDK in an EC2 instance running Amazon Linux 2.


Installation via shell commands

SSH to your Amazon Linux 2 EC2 Instance and run the command below.

curl https://omnitruck.chef.io/install.sh | sudo bash -s -- -c current -P chefdk

This will install the latest version of ChefDK.

For production systems we should specify the specific version of ChefDK or else this will install the version. To do this we need to add the -v option in the end of the command.

Below is an example where we install ChefDK version 4.7.73.

curl https://omnitruck.chef.io/install.sh | sudo bash -s -- -c current -P chefdk -v 4.7.73

Next is to check if chef was installed properly. Go to the Verification section of this post.


Installation via ChefDK Download Page

Go to https://downloads.chef.io/chefdk.

You may select your desired version for ChefDK. Default is the latest stable version.


Copy the URL for the latest version of Red Hat Enterprise Linux.

Continue reading How to install ChefDK in Amazon Linux 2

How to Install Group Policy Management Tool in Amazon Workspaces Windows 10

Group Policy Management Console is one of the tools needed to do Active Directory Administration, especially if you want to control what Amazon Workspaces can do.

This is the same program that is launched when you run the command gpmc.msc on Windows Run.

To install Group Policy Management in Amazon Workspaces Windows 10, follow the tutorial below.


Steps to Install Group Policy Management

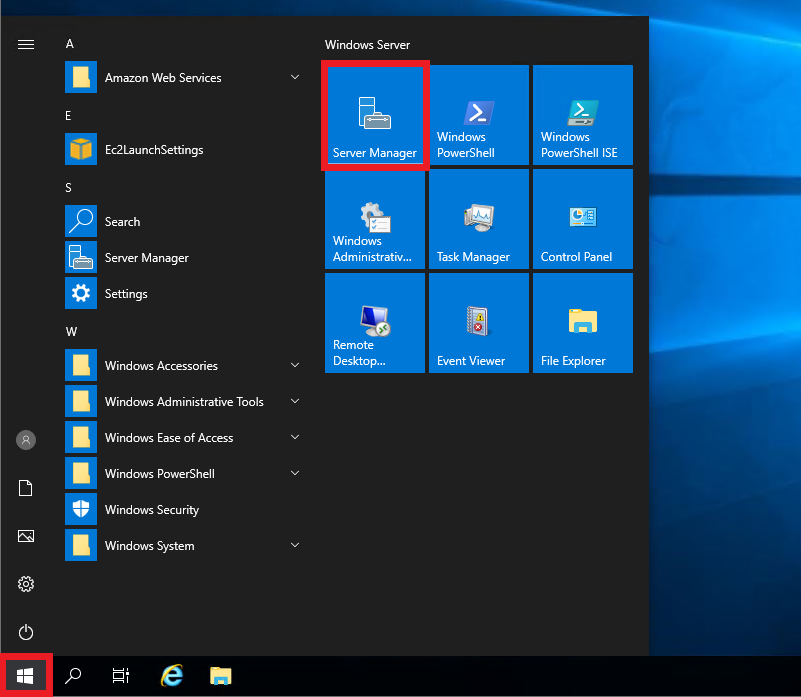
Open Start Menu, then click Server Manager.

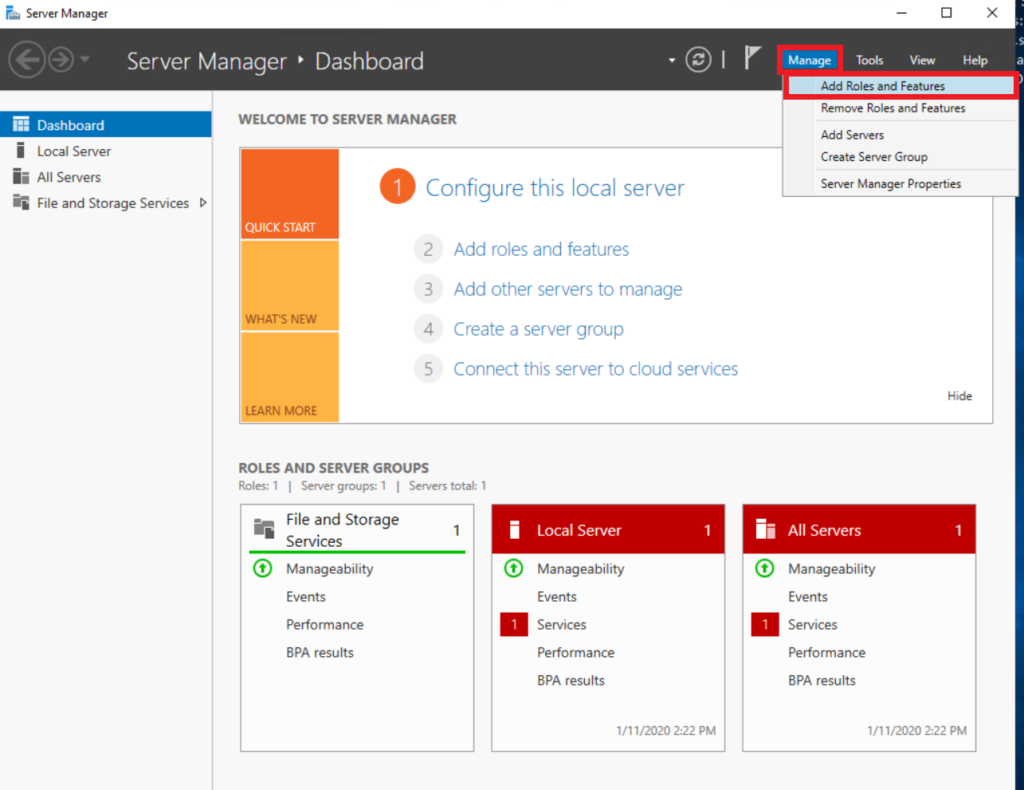
Click Add roles and features. The Add Roles and Features Wizard will be opened.

Continue reading How to Install Group Policy Management Tool in Amazon Workspaces Windows 10

How to install Active Directory Administration Tools in Windows Server

If you need Active Directory Users and Computers on your Windows Server, you need to install Active Directory Administration Tools.

The walk through below will also install other AD Administration Tools like DNS configuration and optional if you want to install Group Policy Management.

Tutorial below have been tested in Windows Server 2016, Windows Server 2019 and Amazon Workspaces Windows 10.

I learned the steps below when I was configuring Amazon Workspaces Windows 10 to do Active Directory Administration. I was avoiding to RDP to the AD Domain Controller to lessen the impact when I make adjustments that is why I needed the Active Directory Management Tools inside my Amazon Workspace.

Note: It is best if your Windows Server is already joined to an Active Directory Domain.


Step-by-step Instruction to Install Active Directory Administration Tools

Click on Start Menu and click Server Manager.

On Server Manager click Add roles and features.

Continue reading How to install Active Directory Administration Tools in Windows Server

Grafana monitoring for AWS CloudWatch via EC2 IAM Role

Grafana is an open source software to create visualization of time-series data. This can graph AWS CloudWatch Metrics too.

As a security best practice when using Grafana on an EC2 Instance it is recommended to use an IAM Role. Using a credentials file may expose access to your AWS Account if ever other people gain access to your Grafana Server.

Follow the step-by-step instructions below on how to attach an IAM Role to your Grafana EC2 Instance and set Grafana to access CloudWatch.

Creation of IAM Role for Grafana EC2 Instance

Create an IAM policy with the below permission in JSON. Name this GrafanaAccessPolicy.

{
  "Version": "2012-10-17",
  "Statement": [
    {
      "Sid": "AllowReadingMetricsFromCloudWatch",
      "Effect": "Allow",
      "Action": [
        "cloudwatch:DescribeAlarmsForMetric",
        "cloudwatch:ListMetrics",
        "cloudwatch:GetMetricStatistics",
        "cloudwatch:GetMetricData"
      ],
      "Resource": "*"
    },
    {
      "Sid": "AllowReadingTagsInstancesRegionsFromEC2",
      "Effect": "Allow",
      "Action": ["ec2:DescribeTags", "ec2:DescribeInstances", "ec2:DescribeRegions"],
      "Resource": "*"
    },
    {
      "Sid": "AllowReadingResourcesForTags",
      "Effect": "Allow",
      "Action": "tag:GetResources",
      "Resource": "*"
    }
  ]
}

Then create an IAM Role with the following properties.

Trusted Entity TypeEC2
PoliciesGrafanaAccessPolicy
Role nameGrafanaAccessRole
Continue reading Grafana monitoring for AWS CloudWatch via EC2 IAM Role

How to install Grafana on EC2 Amazon Linux 2

Grafana is an open source software that specializes in creating graphs and visualizations for users to easily understand the time-series data.

On this step-by-step guide, we will be launching an EC2 Instance with Amazon Linux 2 as the operating system, then install and run Grafana.

EC2 Instance Setup

Launch an EC2 Instance using the Amazon Linux 2 AMI.

For reference here are the settings of my EC2 Instance.

AMIAmazon Linux 2
Instance Typet2.micro (free tier) or
t3a.nano (cheapest)
Storage8GB General Purpose SSD (gp2)
TagsKey: Name
Value: Grafana-Server
Security GroupSee below (EC2 Security Group Setup)

Note: This post is about installing Grafana on Amazon Linux 2. Launching an EC2 Instance will not be discussed here.

EC2 Security Group Setup

For the EC2 Instance Security Group I opened SSH (22) and default Grafana port (3000) to the internet (0.0.0.0/0).

Continue reading How to install Grafana on EC2 Amazon Linux 2

How to check if your Windows 10 is 64-bit or 32-bit

When selecting a program installer to download it usually has 2 options: 64-bit installer or 32-bit installer. How do I know which one to download?

TL;DR – click here for instructions.

Nowadays, websites can know which version of Windows you are running and would only give you one link to download the installer. Sometimes, it is not that easy like how I installed Visual Studio Code for all Users in Windows which gave me lots of options, Windows, Linux, Mac, 32-bit or 64-bit versions.

It is important to download the correct version of the installer or else it might not work correctly with your system.

To see what architecture your Windows Operating System is running, see the different ways below.


3 ways to check if your Windows Architecture is 64-bit or 32-bit


Via Graphical User Interface (with screenshots)

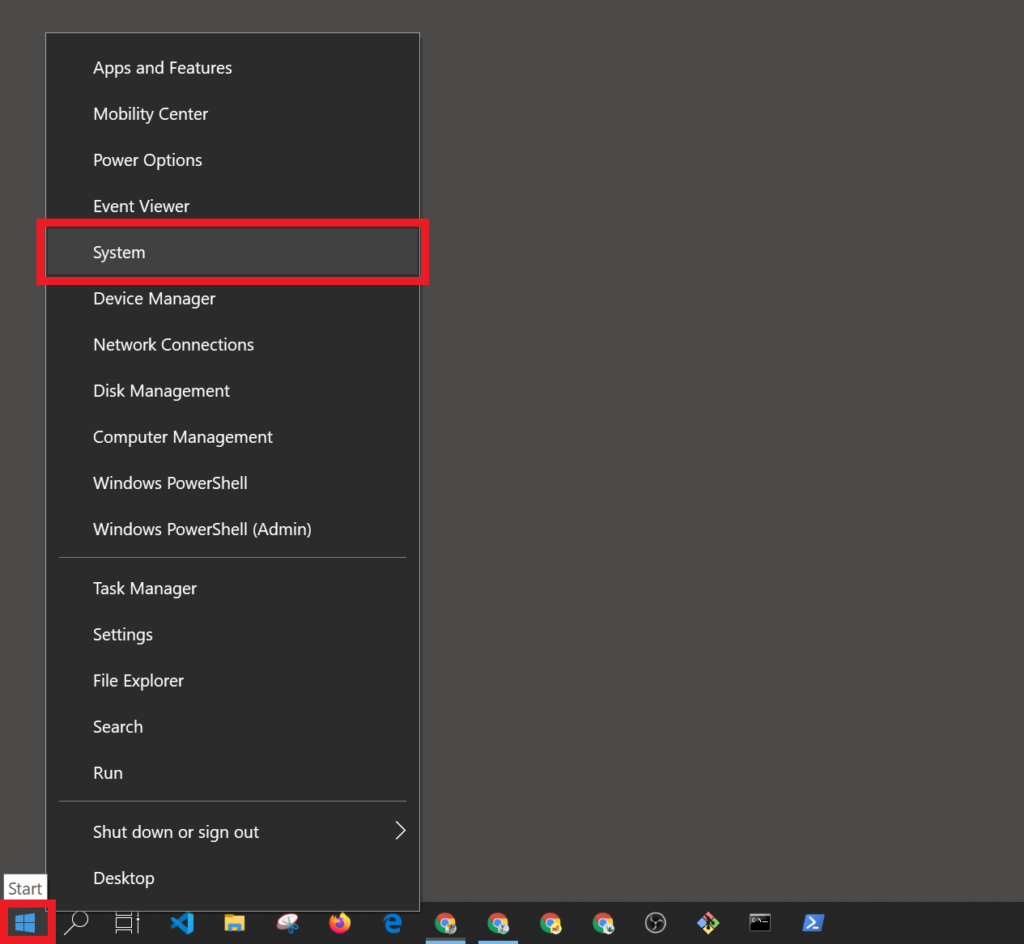
To check if your running a Windows 64-bit or 32-bit, right-click on the Start Button (Window button on the lower left of your screen) or on your keyboard click Window+X.

Then click System.

This will open a Settings window that shows details about your computer.

Continue reading How to check if your Windows 10 is 64-bit or 32-bit

Installing Visual Studio Code for All Users in Windows

I am trying to install Visual Studio Code for all users in Windows but it always installs for a single user. Is there a way to install it one time and it is installed for all users?

Yes, there is a way to install Visual Studio Code for all users in Windows.

TL;DR – Download the System Installer here and install.


The Problem

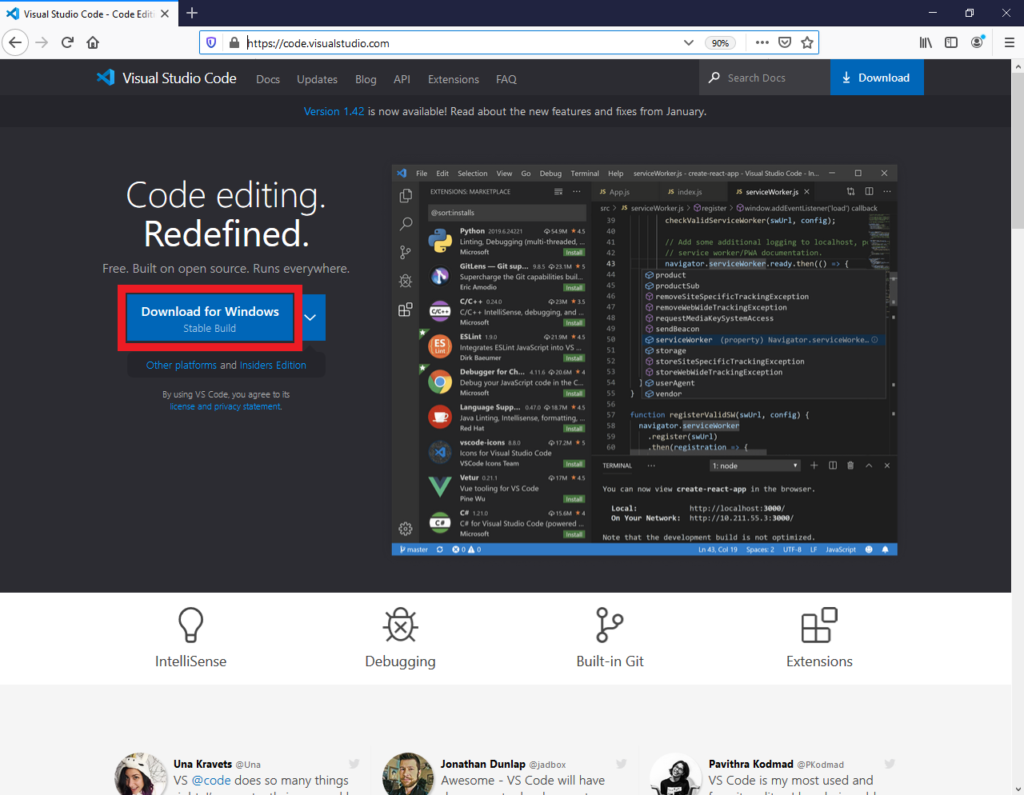
Visiting the website of Visual Studio Code (code.visualstudio.com) and pressing Download for Windows will download the installer for a single user in Windows.

What if you have multiple users in your Windows computer like me? I have a different User Accounts for different projects and different use cases. I had to install for different users.

Follow the tutorial below to install Visual Studio Code for all Users.

Continue reading Installing Visual Studio Code for All Users in Windows

Copying a Key Pair Generated by AWS to Another Region (with Screenshots)

I have an existing key pair that was generated via AWS Console. Since I do not want to create another set of Key Pair for the other regions, I would like to use the same Key Pair. Is it possible to copy the Key Pair to another Region? How can I do this?

Dany


Hi Dany, the short answer to your question is yes, it is possible to copy your existing AWS generated Key Pair to another region and even copy this to another AWS account.


The Challenge with AWS Generated Key Pairs

Generating the Key Pairs via AWS Console is easy, it gives you the Private Key and you can launch EC2 instances and associate it with your instance by adjusting the settings during EC2 Instance Launch. Then you can SSH to your EC2 Instance via the Private Key.

The issue here is the Public Key. AWS does not provide the Public Key during creation or any time after that.

Do not worry, we can still get the Public Key. It is not easy as clicking on the console then selecting copy to other region, but it is still doable.

See the steps below.


Step-by-step guide on copying a Key Pair to another region.

For this tutorial, I have created an AWS Key Pair in N. Virginia Region (us-east-1) – radishlogic_key.

The goal is to copy the Key Pair to Oregon Region (us-west-2).

Here are screenshots of my Key Pair.

Key Pair in AWS Console
Private Key

1. Retrieving the Private Key in N. Virginia Region (us-east-1)

Launch a temporary Linux EC2 Instance in where the Key Pair is located (us-east-1). Any Linux Image will do.

Continue reading Copying a Key Pair Generated by AWS to Another Region (with Screenshots)

Setup IIS FTP on Windows Server

I will be transferring a lot of files to my Windows Server and File Transfer Protocol (FTP) would be a great way to do this.

Below is a step-by-step instruction on how you can install and configure FTP via Windows Internet Information Services (IIS).

By the way, I have tried the instructions below on Windows Server 2012, Windows Server 2016 and Windows Server 2019.

Setup

Testing

Installation of IIS FTP

1. On Windows Server open Server Manager.

Click on Start Button on the taskbar, then click Server Manager.

Start Button is the window icon on the bottom left of the screen.

2. On Server Manager window, click on Manage then Add Roles and Features.

3. On Add Roles and Features Wizard window, click on Next.

Continue reading Setup IIS FTP on Windows Server

Running Minikube in AWS EC2 (Ubuntu)

If you are studying Kubernetes and having a hard time running Minikube on an EC2 Instance, you are not alone. I had a hard time doing it when it was my first time.

Below are the steps (and some comments) that I took to help me run Minikube on my EC2 Instance.

Installation of Minikube on EC2 Ubuntu

1. Run a public EC2 Server with the following setup

AMI Ubuntu Server 18.04 LTS (HVM), SSD Volume Type
Instance Type t3.micro (2 vCPU, 1GB Memory)
Storage 8 GB (gp2)
Tags – Key: Name
– Value: Minikube
Security Group Name: Minikube Security Group
– SSH, 0.0.0.0/0
Later we will be editing this.
Key Pair Create your own keypair.
You will need this to SSH to your EC2 Instance

Update: I changed the Instance Type from t2.micro (1 vCPU) to t3.micro (2 vCPU). An update to Minikube required a minimum of 2 vCPUs. The error when running with t2.micro was Requested cpu count 1 is less than the minimum allowed of 2.

t3.micro is no longer in the Free Tier, make sure to stop or terminate the instance after you are done testing to avoid a huge AWS bill.

Thank you to everyone in the comments section who pointed this change.

2. SSH into your created EC2 Instance using your keypair.

ssh ubuntu@<ipv4_public_ip> -i <keypair>.pem

3. Install kubectl

curl -LO https://storage.googleapis.com/kubernetes-release/release/`curl -s https://storage.googleapis.com/kubernetes-release/release/stable.txt`/bin/linux/amd64/kubectl
chmod +x ./kubectl
sudo mv ./kubectl /usr/local/bin/kubectl

4. Install Docker

sudo apt-get update && \
    sudo apt-get install docker.io -y

Minikube requires Docker. Continue reading Running Minikube in AWS EC2 (Ubuntu)